• Skip to primary navigation
  • Skip to main content
  • PRICE LISTS
    • PRICE LIST: NAILS
    • PRICE LIST: MAKE-UP
  • CONTACT
  • SHOP
  • TESTIMONIALS
  • FAQ
    • Nails FAQ
    • Make-up FAQ
  • T&Cs
    • Refund and Returns Policy
    • Terms & Conditions
  • Nav Social Menu

    • Facebook
    • Instagram
    • Pinterest
  •  

Rambling Rose

  • Price Lists
    • Nails
    • Make-up
  • Shop
  • Blog
    • Articles
    • How to … & Tutorials
    • Make-up brushes & tools
    • Nails
    • Product Reviews
  • Contact
  • T&Cs
    • Refund and Returns Policy
    • Terms & Conditions
  • Press

Marbled Nail Art Tutorial

December 19, 2016 | How to ... & Tutorials, Nails | Leave a Comment

Peach marbleFor this marbled nail art tutorial you’ll need:

– Nail polish remover
– lint-free wipes or cotton pads
– an orangewood cuticle stick or cuticle pusher
– 180-grit buffer or a buffing block (the ones with 4 different sides)
– a 180-grit nail file
– base coat
– three contrasting nail polish colours of your choice
– top coat
– a mini striping brush (small paintbrush or clean eyeliner brush)
– cuticle oil and hand cream

Start off by prepping your nails. Remove any old polish, push back your cuticles, file your nails into the shape you want and then buff them lightly.

IMG_7651
Cleanse your nails again with nail polish remover to remove any nail dust and natural oils that will have come to the surface of the nail. Apply a thin layer of base coat and cure it according to the instructions on your lamp (for gel) or wait for it to dry, if you’re using traditional nail lacquer.

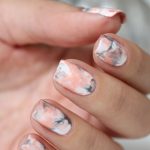
Apply a thin coat of your chosen base colour, I’m using Artistic Colour Gloss in “Bride” (white) but you can use any light colour and make sure to cap the free edge. Cure or wait for it to dry.

IMG_7652
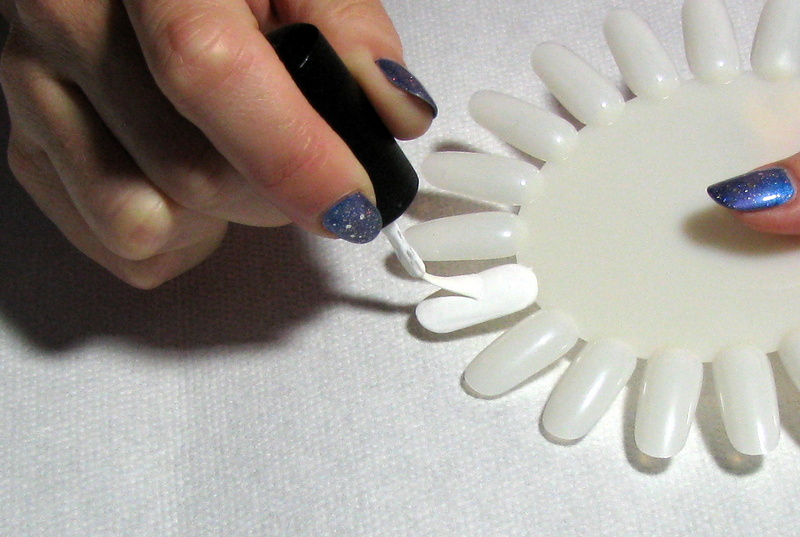
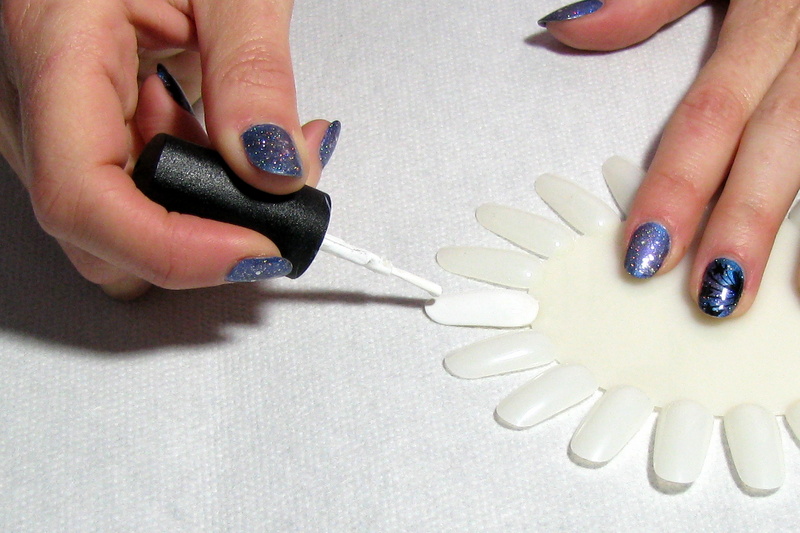
Apply a second, thin coat of your chosen base colour and while this is still wet (don’t cure or wait for it to dry), add a few dots of your contrasting colour. I’ve used Artistic Colour Gloss in “Rhythm” (lilac) instead of a peach colour as shown in the main picture. You can use any colour you like and this marbled effect works well with any colour combination, as long as you have light, medium and dark colours (or if you’re only using two, a light and a dark). You’ll want to add dots of your darker colour as well, before attempting to marble the polishes together, as traditional polish will start to dry, making the marbling difficult.

Note: I have marbled the lilac colour first (see pictures below), to try and show how to do the figure 8 motions and what the marbled effect should look like.

IMG_7653IMG_7654IMG_7655

IMG_7656
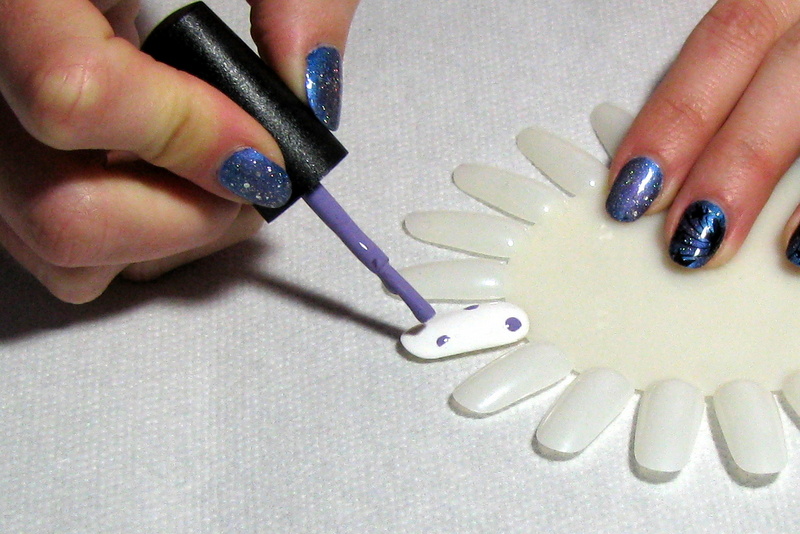
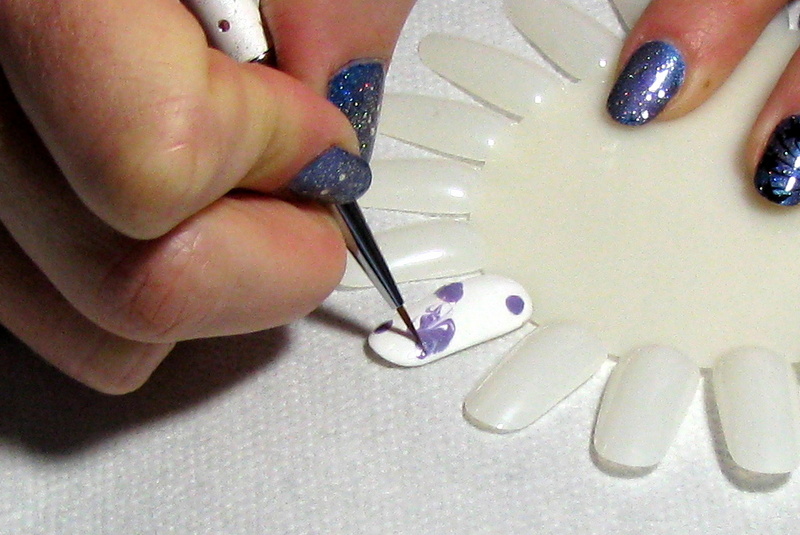
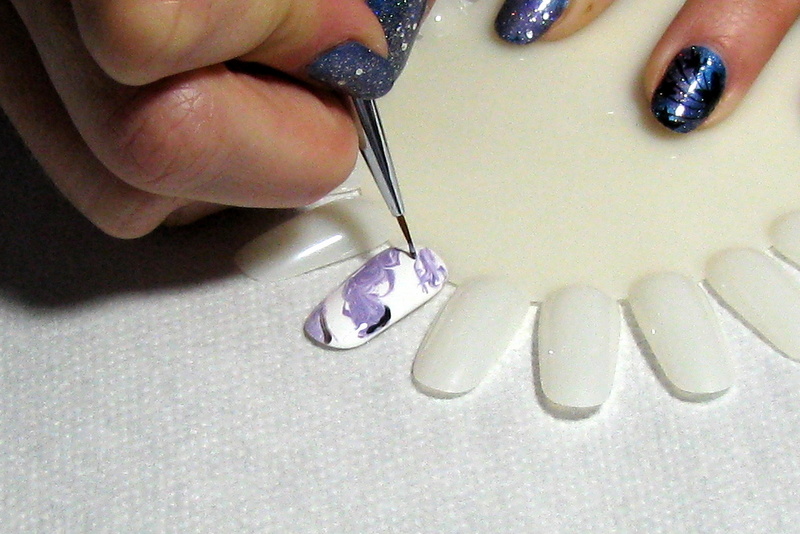
After you’ve placed your dots of polish onto the wet base coat, grab your mini striping brush, small paintbrush or clean eyeliner brush, dip the brush into your darkest nail polish colour (I’m using Artistic Colour Gloss in “Empowered”, which is a dark charcoal grey) and paint thin, random squiggly lines across your nails. Then using small figure 8 motions, gently start to blend the three colours together, creating a marbled effect.

IMG_7657
You need to work quite quickly if you’re using traditional nail lacquer and, with this technique, less is more. Meaning that the less you play with it, the better it will look. If you try to push it around too much, you may end up with a muddy coloured mess instead of a nice marble.

IMG_7659
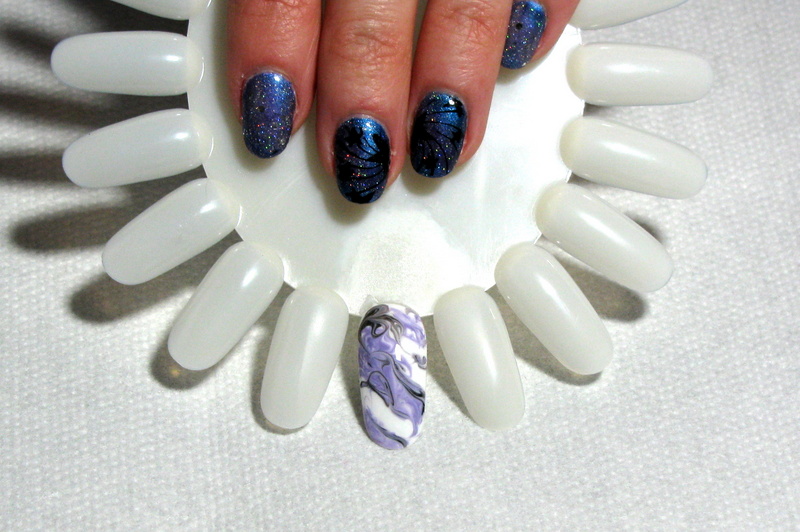
Once you’re happy with the effect, cure the polish or wait for it to dry. Apply your top coat and cure or wait for it to dry. Finish off your manicure by rubbing cuticle oil into your nails, cuticles and skin around your nails. Cuticle oil applied daily will nourish your nails and help your polish to last longer by keeping it flexible. Apply a little hand cream and you’re done.

If you haven’t already, please don’t forget to read my previous post “Maintaining your Manicure” for tips on how to keep your manicure looking good for longer.

Share this:

  • Facebook
  • Twitter
  • Pinterest
  • Print

Reader Interactions

Leave a Reply Cancel reply

You must be logged in to post a comment.

Got a holiday or special occasion coming up? Did Got a holiday or special occasion coming up? 
Did you know you can book your manicure or pedicure appointments up to three months in advance using the online booking system.

Sit in the comfort of your own home and plan when you'd like to have your mani or pedi done, book your appointments, sit back and relax. You'll receive automated reminders 48 hours (via email) and 24 hours (via text) before each appointment.

Book online now:  https://www.fresha.com/a/rambling-rose-nails-and-make-up-mangawhai-thelma-road-north-i1d1r1d4/booking?menu=true&dppub=true&employeeId=450913&pId=142955

 #nailsbyappointment #mangawhainailtech #mangawhainailsalon #ramblingrosenails #mangawhai
This step-by-step guide will show you how to groom This step-by-step guide will show you how to groom your brows at home.  Before you start, make sure the have the following on hand:  an eyebrow brush & eyelash comb (usually on the same brush); two eyeliner pencils (any colour); tweezers and small scissors.

Read the article:  https://www.ramblingrose.co.nz/how-to-groom-your-brows/

 #groomyourbrows #doityourself #browtips
Gel-On Xtensions with a French finish and Lilo & S Gel-On Xtensions with a French finish and Lilo & Stitch feature nails. 
($104 for this set). Removal of product from another salon costs extra.

If you'd like nail art with your mani or extensions, please book an appointment WITH nail art - I need the extra time allocated.

 #liloandstitch2025 #liloandstitchnails #liloandstitchfrenchies
Times are tough, we've all been feeling the pinch, Times are tough, we've all been feeling the pinch, but I still love my clients to have pretty nails. So, with immediate effect, the price on all nail art will revert to $2 per nail.  This means a saving for you of $10 per full set, or $1 per nail.

As always, feel free to bring a picture of what you'd like to your appointment and I'll see what I can do.  Just be sure to book a mani or pedi WITH nail art, so that I have sufficient time.  If you haven't already booked your next appointment at Rambling Rose, please do so online:  https://www.fresha.com/a/rambling-rose-nails-and-make-up-mangawhai-thelma-road-north-i1d1r1d4/booking?menu=true&dppub=true&employeeId=450913&pId=142955

 #nailsbyappointment #mangawhainailtech #ramblingrosenails #nailart
Winter nail art inspiration. If you've booked in Winter nail art inspiration.

If you've booked in for nail art, feel free to bring and inspiration picture with to your appointment.

 #pinterest #pinterestinspo #pinterestnails #pinterestphoto
What’s the best colour eyeshadow for green eyes? What’s the best colour eyeshadow for green eyes? 

As we all know, complementary colours (colours opposite each other on a colour wheel) create a strong contrast and enhance each other. 
Read the full article on the Rambling Rose blog:  https://www.ramblingrose.co.nz/eyeshadow-for-green-eyes/

 #makeupandgreeneyes #greeneyes #greeneyesandeyeshadow
'Fierce,' a plum-coloured purple creme that's perf 'Fierce,' a plum-coloured purple creme that's perfect for winter.

 #fierce #plumnails #plummanicure #purplenails
Reniu (by Pure Fiji) is the affordable coconut car Reniu (by Pure Fiji) is the affordable coconut care collection dedicated to skin bliss for everyone, every day. Bringing multitasking, ultra-hydrating pure virgin coconut oil to all skin needs, protecting it from damage, and creating skin health at every level.

Because Reniu believes in the beauty of high quality ingredients that nourish us all,
naturally, Reniu pioneered the use of pure virgin coconut oil in skincare with plant-forward, cold-press extraction that protects its healing and hydrating properties. 

Available in these infusions (scents):
- Bamboo Lychee (fresh, clean scent)
- Coconut (sweet / tropical)
- Frangipani (musky floral)
- Hibiscus (sweet floral)

Treat your skin to a tropical holiday with the Reniu Skincare Range, available from our online store www.ramblingrose.co.nz/shop - find it under the Body & Nail Products category.

 #reniu #reniuskincare #purefijinz #affordableskincarenz
Do you prefer darker nails in winter? #artistic Do you prefer darker nails in winter? 

 #artisticcolourglossfashionista #darkpurplenails #darkpurplemanicure
Do you struggle with your make-up because you wear Do you struggle with your make-up because you wear glasses? 
Wearing glasses can affect the way that your make-up looks as the size of the frames can attract attention, highlight certain areas, or create unwanted shadows.

Need a few tips on what to do and what not to do?  Read the full article on the Rambling Rose blog:  https://www.ramblingrose.co.nz/make-up-and-glasses/

 #makeuptips #makeupandglasses #applyingmakeup

Copyright © 2025 · Rambling Rose